The previous versions of Maximo all came with an installation guide that helped you install a Maximo application server for production purposes and also for testing or development purposes. In most cases, this is how most of our applications are setup. Unfortunately, Maximo 7 does not come with any demo data or even an installation guide for installing a MaxTest instance. The Maximo install guide does show you how to install one instance on one server, but some of you may want to install a MaxTest application server as well as your MaxProd application server. This guide will show you just how to add a MaxTest Maximo application using WebSphere. It also assumes that you have successfully completed the installation for your Maximo 7 production application.
Step 1:
Create a backup copy of your Maximo production database. I will assume most of you know how to do that, but if you don’t, you can find a guide for backing up a SQL Server database here or an Oracle database here. After you have created a backup, restore the database and name it MaxTest.
Step 2:
Moving on to WebSphere, log into the admin console. The default username is now ‘wasadmin’. Expand ‘Servers’ and click on ‘Application Servers’. There you should find one instance called ‘MXServer’ which is the one you already installed. Click on ‘New’ to create a new app server. Enter ‘MXTest’ as your server name and hit ‘Next’. Accept the default template and check the box for ‘Generate Unique Ports’. Finish and confirm your new app server. Finally save directly to your master configuration.
Step 3:
Click on the ‘MXTest’ app server. Under ‘Server Infrastructure’, expand ‘Java and Process Management’ and click on ‘Process Definition’. Click on ‘Java Virtual Machine’ under the Additional Properties. Here you need to set the Initial Heap Size to 512 and the Maximum Heap Size to 1024. Don’t forget to save to master.
Step 4:
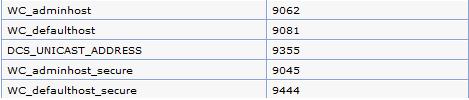
Now we need to know what our new application server is using for ports. Go back to your Application Server list and click on ‘MXTest’, expand ‘Ports’ and make note of the ports numbers for the four port names that begin with ‘WC’. The port numbers should look like this:
These port number were auto generated for you in step 2.
Step 5:
Now we need to create a new virtual host. Expand ‘Environment’ in the left pane and click on ‘Virtual Hosts’. Here you will see a list of hosts such as maximo_host, admin_host, etc. Click on ‘New’ and name it ‘maxtest_host’ and click on Apply. Now click on ‘Host Aliases’. This list should be empty, and we will be creating 5 new aliases. Click on ‘New’ and accept the default port 80 and click ‘Apply’. Next, create four more ports that look like the following:
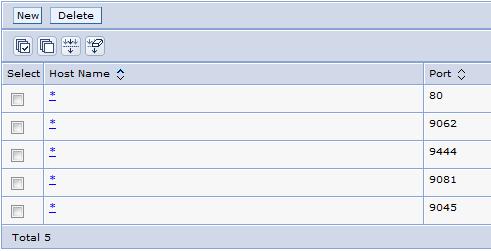
These port numbers are from step 4.
Step 6:
Go to your maximo installation directory, the default is “C:/ibm/SMP”. In there, you will find a maximo directory. Copy that entire directory and rename it ‘maxtest’. Once you’ve done that, go to “C:/ibm/SMP/maxtest/applications/maximo/META-INF” folder and open the ‘application.xml’ file. Do a search for
/maximo
and change it to
/maxtest
This will be use in the url for connecting to your new instance. For example, the url for connecting to your maximo test application server will be
http://servername/maxtest
Next, edit the same property in the ‘deployment-application.xml’ as well. Save both files.
Step 7:
Open your maximo.properties file found at ‘C:/ibm/SMP/maxtest/applications/maximo/properties’. Change the ‘database’ to the name of your newly created SQL Server database. The database property should look something like this:
database=MAXTEST&language=us_english&nowarnings=true&mars=false
Next change the ‘mxe.registry.port’ property. Just to make it simple, just add one to the existing value. Finally, the last property to modify is ‘mxe.int.webappurl’. Change it so look like so:
mxe.int.webappurl=http://:9081/meaweb mxe.int.globaldir=MaxTest
Step 8:
The last step is to rebuild and deploy your maximo ear files for the newly created maxtest application server. After you are done that, you can access your maximo test environment at ‘http://servername/maxtest’
When you are deploying a new enterprise application for your second instance, make sure you name your application ‘MAXTEST’.
Share this postAs Maximo Experts, we have developed several add-on products for Maximo that mobilize the work force, simplifies assignments, provides ad-hoc reporting capabilities and facilitates the seamless integration of Service Requests into Maximo.
Check out our products by clicking on the following links: EZMaxMobile, EZMaxPlanner and EZMaxRequest.
Thanks for this information. We’ve been puzzling how we were going to bring up a few different development environments without requesting additional servers.
Tobin says: Excellent…I will try it next week. Thanks a lot. maximo_hater says:Long live Maxiotimes. I got it working with IBM WebSpeher and Oracle 10g combination. I followed step by step and bang, it worked. I owe you a big thank you! God Bless you.
joe says:Worked great for our 7.1 MAM and TSRM. Here are some additional cleanup steps to look at for the database you copied. We used our preprod environ (cluster for ui, cluster for mea, AD authenticated, file mounts for attached docs) copied to 2nd Dev environ (no clusters, single app node, AD authenticated, no file mounts for attached docs).
Update these values in maxpropvalue table to match your new environment. You can do some thru System Properties app, some thru database update.
maxpropvalue.propname =’mxe.doclink.doctypes.defpath’
maxpropvalue.propname =’mxe.doclink.path01′
maxpropvalue.propname =’mxe.LDAPGroupMgmt’
maxpropvalue.propname =’mxe.logging.rootfolder’
maxpropvalue.propname =’mxe.report.birt.disablequeuemanager’
maxpropvalue.propname =’Database.SQL.DatabaseName’
maxpropvalue.propname =’Database.SQL.ServerHostName’
maxpropvalue.propname =’Database.SQL.ServerPort’
maxpropvalue.propname =’Maximo.InstallLocation’
maxpropvalue.propname =’mxe.db.url’
maxpropvalue.propname =’mxe.int.globaldir’
maxpropvalue.propname =’WAS.CellName’
maxpropvalue.propname =’WAS.DeploymentManagerHostName’
maxpropvalue.propname =’WAS.NodeName’
maxpropvalue.propname =’WAS.VirtualHost’
maxpropvalue.propname =’WAS.WebServerHostName’
hi..im trying to create..the suggested instance……still..unsuccessful….by the way im upgrading from maximo 4.01 to 7.1…anyother suggestions….i was given to understand, for the actual solution, I must subscribe…kindly comment. thks